top of page
Miss C Teaches
Miss C Teaches
Editing 1
LO's - understand how to edit in the style of Craig Cramer
Do now:

Contact Sheet
As creatives, we are always editing our work and this is where it starts.
This is a contact sheet of a previously unseen Andy Warhol photography shoot. And traditionally contact sheets are made out of developed 35mm film that's been exposed with light onto photo paper in the darkroom.
But you can see he hasn't stopped there, Andy Warhol has gone through and made selections about the frames he doesn't like.
This helps us as photographers to confidently make selections about the work that we like or don't like. And back then, it would've saved a lot of time & materials.
But today, we are going to do it digitally in Google Slides.
Insert > Image > Drive

Make your own selections
Select 4 of your best images!

Edit workshop

Basic Editing
If your image is under or over exposed, you will need to fix that using the
Brightness/Contrast or Exposure presets...
Exposure in photography is the amount of light that
reaches a camera's sensor or film when a picture is taken


4 squares
Make a decision about cropping your image
File > Export > Export as > Jpg


Open the cropped image in a new file
Copy this and create a second layer
Image > Transform > Flip horizontally
Select both layers
Image > Transform > Rotate 180
Further editing
This is where to
find the same
presets but in
Photopea instead...
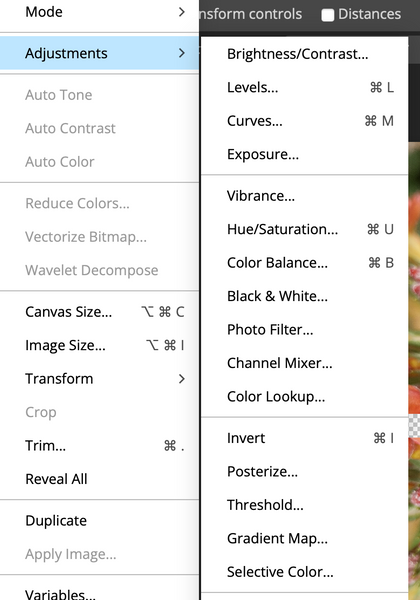
Vibrance allows you to adjust colour intensity
Hue/Saturation lets you adjust the colour, purity and how light or dark (exposed) the image is.
Curves allows you to manipulate the colour even further.More information > https://tinyurl.com/2afye3bd
Curves


Hue/Saturation
Vibrance


Invert will show colour opposite on the colour wheel
Extension

File > New > A4 > Landscape

Copy your image into a new canvas
Then rotate it like the image above
Make sure the angle is set to 60 degrees

Use the object selection tool for the triangle

Edit > copy. Edit > paste.

Bring together


Deselect bottom layer
Right click
Merge visible


View all layers
Right click bottom layer
Lock all layers

Copy and paste
ctrl C > ctrl v

Select triangle
Edit
Transform
Flip vertical
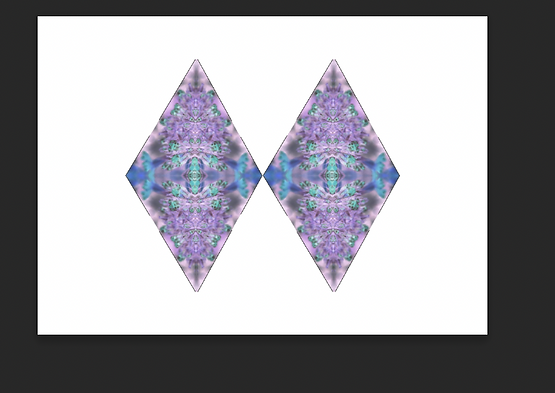
Bring together in a diamond shape
copy and paste

Copy and paste triangle layers into gaps


bottom of page